

Figma Prototypes: From Static to Compelling A Six-Step Process Use motion to convey emotion and build empathy, Gain recognition.

xd wang
Dec 8, 2025

xd wang
UI/UX Specialist
Framer & Aura template expert Helping founders launch websites in 7 days. Google-certified UX designer focused on high-conversion templates. Exclusive template
Follow Author
Related Posts

The Prototype That Saved My Career (And How Yours Can Too)
Picture this: You're in a conference room, laptop open, palms sweating. Your stakeholders are staring at your beautiful static mockups with the enthusiasm of people watching paint dry. "But how does it work?" the CEO asks. Your carefully crafted screens suddenly feel like expensive wallpaper.
I've been there. We've all been there.
The difference between designers who get buy-in and those who don't often comes down to one thing: the ability to make people feel the product before it exists. And that's where Figma prototyping transforms from a nice-to-have skill into your secret weapon.
Let me show you how to turn those static screens into a persuasive experience that makes stakeholders pull out their credit cards (metaphorically speaking, unless you're freelancing—then literally).
Why Motion Matters More Than You Think
Before we dive into the technical stuff, let's talk about why this matters.
Static designs show what your product looks like. Prototypes with motion show what your product feels like. And here's the kicker: humans make decisions based on feelings first, logic second. Neuroscience backs this up—emotional responses to design happen in milliseconds, before conscious thought kicks in.
When you present a prototype that slides, fades, and responds to interactions, you're not just showing screens. You're creating an emotional preview of the actual product experience. Your stakeholder's brain starts releasing those sweet, sweet dopamine hits as they interact with your design, associating positive feelings with your proposal.
Translation: Motion design isn't decoration. It's persuasion architecture.
The Six-Step Figma Prototyping Journey
Let's break down the complete process, from those lonely static screens to a shareable prototype that makes people say "When can we ship this?"

Step 1: Layout Your Screens (The Foundation)
Think of this as setting up dominoes. Before they cascade beautifully, you need them arranged properly.
Open your Figma file and organize your frames in the logical order of your user journey. If your screens are scattered like my desk after a deadline, you're going to have a bad time. Arrange them left-to-right or top-to-bottom following your user flow.
Pro tip: I like to arrange screens by user task, not by design similarity. Group all screens related to "booking an appointment" together, even if they look different. Your future self (and anyone reviewing your work) will thank you.
Step 2: Create Initial Connections (Where Magic Begins)
Here's where your static museum transforms into an interactive experience.
Switch from Design to Prototype mode in the right panel. See that little circle (connection node) that appears when you select an element? That's your magic wand.
Click on the button or element that should trigger the transition. Grab that connection node and drag it to the destination frame like you're lassoing a wild screen. A blue arrow appears—congratulations, you've just created your first interaction.
But here's what separates beginners from pros: intentional connection design. Don't just connect everything to everything. Think about the user's mental model. Where do they expect to go when they tap that button?
Step 3: Add Interaction Details (The Devil's Playground)
Now we're getting spicy. Each connection has three critical components:
Triggers define what causes the interaction:
On Click/Tap (the classic)
While Hovering (for web)
After Delay (for auto-advancing screens)
On Drag (for swiping gestures)
Actions determine what happens:
Navigate To (moves to another screen)
Open Overlay (shows modal or popup)
Swap With (replaces content in place)
Back (returns to previous screen)
Destinations specify where users land.
Here's where most people stop, thinking they're done. But the real persuasive power lies in the fourth dimension: time.
Step 4: Adjust Animations (Where Persuasion Lives)
This is where your prototype goes from "okay" to "take my money."
Figma offers eight animation types, and choosing the right one is like choosing the right soundtrack for a movie scene. Let me break down the psychology:
Instant (no animation): Use sparingly. Feels jarring, like a jump cut in a film. Good for snappy interactions like toggling switches.
Dissolve: Smooth and professional. Says "we're polished, we're premium." Perfect for transitions between distinct sections.
Smart Animate: The showoff move. Morphs elements intelligently across frames. Makes designers look like wizards and makes stakeholders forget their objections.
Move In/Out: Directional and intuitive. Shows spatial relationships. When a screen "moves in" from the right, users unconsciously understand they're moving forward in the flow.
Push/Slide: Creates depth and context. Says "this content is related but distinct." Instagram uses this extensively—there's a reason it feels so good.
[IMAGE: Comparison of different animation types in action]
The persuasion secret: Match your animation to your message.
Pitching a fast, efficient checkout flow? Use snappy "Instant" or "Move In" transitions. Selling a premium meditation app? Slow "Dissolve" transitions create that zen feeling. Your animation choices should whisper (or shout) your product's personality.
But here's the crucial part: animation speed matters. Too fast feels chaotic. Too slow tests patience. The sweet spot? Usually 200-400ms for most transitions. Your prototype should feel responsive, not sluggish.
Step 5: Complete All Screens (The Discipline Test)
This is where good intentions go to die.
You've prototyped your main flow, it looks gorgeous, and now you're tempted to call it done. Resist that urge. Nothing kills credibility faster than a prototype that works beautifully until someone clicks that one button you didn't connect, then—nothing happens.
The professional move: Create return paths. For every screen you can navigate to, create a way back. That X button in the corner? Connect it. That back arrow? Connect it. That Cancel link? You guessed it—connect it.
I've seen presentations crash and burn because the presenter got "stuck" in their own prototype. Don't let that be you.
Also, think about edge cases. What happens when someone taps outside a modal? What if they want to skip a step? The more complete your prototype, the more confident you appear, and confidence is contagious.
Step 6: Share Your Work (The Victory Lap)
Figma's auto-save is a blessing, so your work is already safe. But sharing requires strategy.
Click that blue "Share" button in the top-right (or "Share Prototype" in presentation mode). You'll get options:
Via email: Good for controlled sharing with specific stakeholders. You control permissions (view vs. edit).
Via link: Better for broader sharing. Create a link anyone can access. Just watch those permission settings—you don't want random internet strangers redesigning your prototype at 3 AM.
[IMAGE: Figma sharing dialog with permission settings highlighted]
Pro sharing tips:
Set the starting frame. Don't make people hunt for where to begin.
Add a proper project name. "Untitled-final-FINAL-v3" doesn't inspire confidence.
Include context. Use Figma's description field to explain what stakeholders should focus on.
Consider device preview settings. Should it display as mobile size? Full screen? Match your sharing to your product.
The Gestures That Win Hearts (And Approvals)
Let's talk about the psychology of gestures, because this is where prototypes become persuasive experiences.
Tapping: The universal language. But even taps can be sophisticated. Add a subtle scale animation (95% size) when someone taps a button. That micro-feedback creates satisfaction—the digital equivalent of a button clicking in real life.
Swiping: Implies browsing, discovery, and casual exploration. Perfect for content-heavy apps. When someone swipes through your prototype, they're not just reviewing your design—they're using your product.
Scrolling: The most overlooked gesture. Use overflow scrolling in your frames to show real content depth. Nothing says "we've thought this through" like being able to actually scroll through a list.
Pinching/zooming: Great for maps, images, or data visualization. Shows you've considered the full interaction model.
The persuasion multiplier: Layer your gestures. Tap to open, swipe to browse, tap again to select. Each interaction successfully completed builds confidence in your design. It's like a video game tutorial that makes players feel smart—your stakeholders come away thinking "wow, this is intuitive" without realizing you carefully orchestrated that feeling.
Motion as Storytelling: The Advanced Move
Here's where we separate the good from the unforgettable.
Great motion design tells a story. When a shopping cart icon bounces and the item counter increases, you're not just showing a state change—you're celebrating a user's action. When an error message slides in with a gentle shake, you're not just delivering bad news—you're softening the blow.
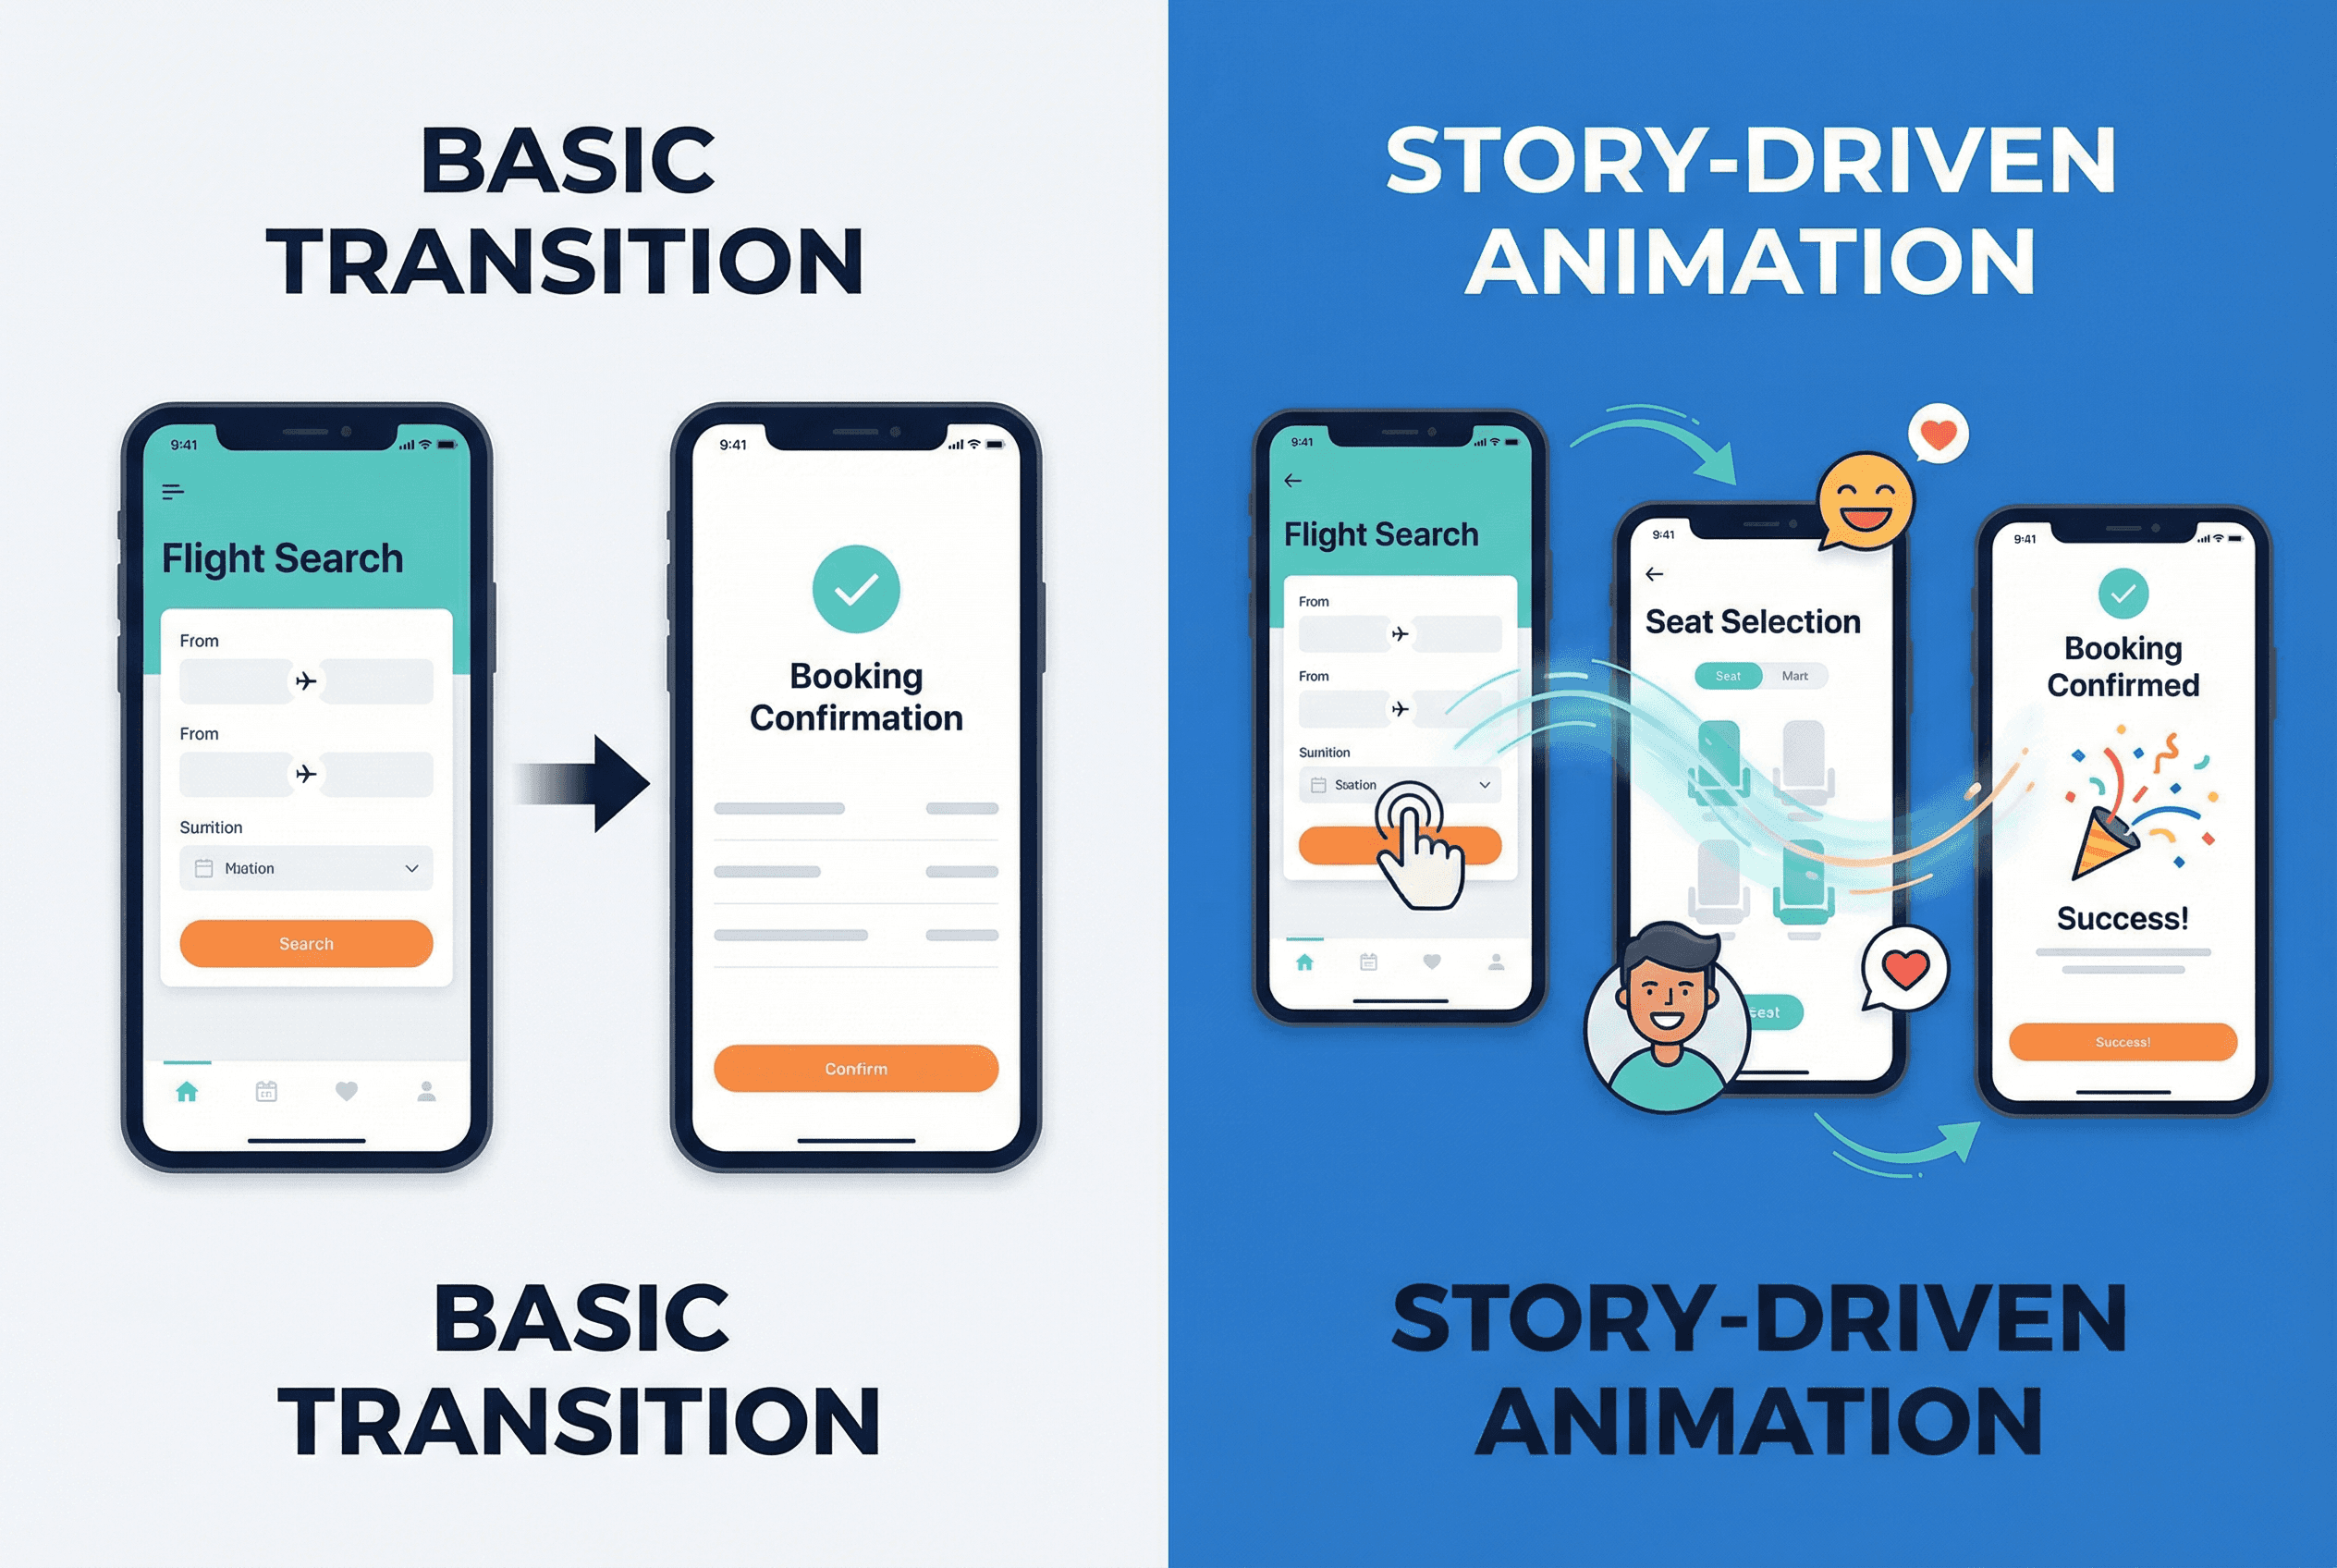
Consider this scenario: You're presenting an appointment booking app.
Amateur approach: Screens simply cut from one to the next. Functional but forgettable.
Professional approach: The appointment button slides the booking screen up from the bottom (implying it's layered above, contextual, temporary). When users book successfully, a checkmark animates in with a subtle bounce (celebration!), then the screen slides back down (returning to context). The entire journey feels natural, satisfying, complete.
See the difference? The second version doesn't just show the feature—it makes stakeholders feel the satisfaction their users will experience.
The Accessibility Perspective (Because Persuasion Includes Everyone)
Quick reality check: Motion can exclude people with vestibular disorders, those who prefer reduced motion, or users on slow devices.
Ethical persuasion means inclusive persuasion. When setting animation speeds:
Keep durations under 500ms for most transitions
Avoid excessive bouncing or spinning
Test on slower devices
Consider adding a "reduce motion" mode for stakeholder presentations
Ironically, acknowledging these constraints in presentations often increases buy-in. It shows you're thinking about real users, not just demo scenarios.
Common Prototyping Pitfalls (And How to Avoid Them)
The "everything animates" trap: Just because you can animate doesn't mean you should. Too much motion creates cognitive overload. Be selective.
The "one-way street" problem: Always create return paths. Dead-end prototypes kill credibility.
The "it works on my machine" syndrome: Test your shared prototype on different devices and browsers. That smooth animation might stutter on an old iPad.
The "over-designed demo" issue: Your prototype should feel like the actual product, not a motion design showreel. Subtle beats showy.
Real Talk: Why Most Prototypes Fail to Persuade
Having reviewed hundreds of design presentations, I've noticed patterns in what works and what doesn't.
Prototypes that fail:
Feel like slideshows with arrows
Break when clicked the "wrong" way
Include motion for motion's sake
Lack narrative flow
Prototypes that win:
Feel like the actual product
Handle interaction gracefully
Use motion to reinforce meaning
Tell a coherent user story
The difference? Intentionality. Every transition, every animation, every gesture should serve the story you're telling about your user's experience.
Your Action Plan
Here's your homework (because reading without doing is like cooking shows without tasting):
Audit your current prototype: Open your last Figma file. How many interactions feel jarring? How many connections are missing? Be honest.
Experiment with one animation change: Take your most important user flow. Change just the animation type. Try Smart Animate instead of Instant. Feel the difference.
Add return paths: Go through every screen. Can users get back easily? Fix the gaps.
Test the emotion: Share your prototype with someone not on your team. Watch their face as they interact. Do they smile? Furrow their brow? Their expressions tell the truth.
Iterate the timing: Speed up animations by 100ms. Slow them down by 100ms. Find the sweet spot where interactions feel responsive but not rushed.
The Bottom Line
Figma prototyping isn't just about connecting screens—it's about creating belief. Every tap, swipe, and transition either builds confidence in your design or erodes it. The difference between a prototype that gets shelved and one that gets built often comes down to how well you've made stakeholders feel the future product.
Master the technical steps (layout, connect, customize, animate, complete, share). But never forget the real goal: persuasion through emotion, achieved through motion.
Now go forth and make prototypes so good, stakeholders forget they're not real yet.
Want to level up faster? The Figma Community has thousands of prototypes you can duplicate and dissect. Clone a few, see how pros structure their connections, then adapt their techniques to your projects. Learning by reverse-engineering beats learning by reading (says the guy who just wrote 2000 words about prototyping).
Your next prototype isn't just a deliverable. It's your pitch, your story, and your ticket to better design outcomes. Make it count.
What's your biggest prototyping challenge? The comments are your space—I read every one and often reply with specific solutions.
#WebDesign
#Framer